
Resources
Monday, 15 January 2018
The American Duchess Guide to 18th Century Dressmaking | A review
I took quite a lot of time to think about how I felt about this book. Not because it isn't great, but because the authors, Lauren Stowell and Abby Cox, had a very clear role for this book to play in costumers libraries, and I was unsure of how this book would be received to those people who may not have the library the authors have. Until very recently, my only access to the works referred to in the Guide were from my university's library and snippets online, so I feared that these resources may be out of reach for many beginner costumes.
But at the heart of every review is the question "would I recommend this book?" and I have to say a very strong and enthusiastic YES despite my aforementioned hesitation; however, my recommendation comes with a heavy caveat. To make the most out of this book I recommend having at least one other 18th-century book with grid patterns (either Janet Arnold or Norah Waugh) or be working from/ have access to existing patterns. The authors have said in many places that this is not a stand-alone book and it fits into existing literature, and as such one would not be able to make a gown with only this book. Though I do think that this makes the book less accessible to beginners, I think the authors accomplish what they set out to do with aplomb.
It is the subtitle of this book really captures what I think the authors succeeded most at and where the reader will learn the most: How to Hand Sew Georgian Gowns and Wear Them with Style. The detailed hand sewing instructions are wonderful and clear, as are the instructions on different stitches, and the patterns and styling notes for accessories make this book well worth the price of purchase. The accessories and styling notes alone make this book worth every penny. I also really enjoyed that the authors encouraged the reader to get into the mindset of a mantuamaker, saving fabric where possible and not being to hung up on things that cannot be seen in the finished garment. They encourage the reader to "sew fearlessly," which I think is a wonderful mantra.
The book itself is gorgeous and seemingly well made. The typography and layout throughout are nice a clean. The pages are a good weight with a handsome semi-gloss, and I love that the book is bound free from the spine so that it can be opened flat without breaking the paper spine, or having the pages trying to close on you.
 |
| Left: 'Portrait of a Lady' by Francis Cotes, 1768. Photo © Tate. CC-BY-NC-ND 3.0 Right: Abbey of American Dutchess, one of the authors, in her dress inspired by the portait on the left. Photo by American Duchess and taken from the blog. |
Throughout the book I felt as though Lauren and Abby were the reader's cheerleaders, reassuring us that mistakes can be fixed and sewing is always a process. This encouragement and permission to make mistakes was a welcome tone for a book which simultaneously calls for rigorous research and strives for historical accuracy down to every stitch. A very careful balance which I think the authors achieved marvellously.
One of the book's less obvious strengths is not in the book at all, but the authors' engagement with the community online. Already we have received 2 official addendums to the book and Lauren and Abby have been easily accessible for questions and advice on their facebook page and blog. For correction on the cap pattern visit this blog post. For a full grided pattern of the Italian gown visit this blog post. And finally, for a blog post all about stays, check this out!
Overall this book would be an excellent addition to a budding or established library but does not stand alone.
Resources
- Portrait of Lady, from the Tate
- The American Duchess Guide: Behind the Scenes With The 1760s Sacque Gown
- Buy the book on Amazon!
Monday, 27 November 2017
Tutorial | 18th Century Petticoat

Making this darn thing was a serious act of hubris. I figured since I had made the stays with no problem and had sewed more complicated garments in the past, how hard could it be to make a pleated tube skirt? So with all the confidence in the world, I took a look at some extant pieces and just started hacking and smashing my way through only to redo this petticoat 3-4 times depending on how you count. Even after looking at some great resources such as American Duchess's Tutorial and the excellent how-to from Koshka the Cat, I still managed to muck it up.
So I thought I would write a blog post, in the hopes you can learn from my mistakes, even though such blog posts did not stop my brazen ego.
In essence, an 18th C. petticoat is just two 50-60" (or 127-153 cm) wide rectangles of fabric (you can always use more but that is bare minimum) pleated and sewn together at the side. Easy! Right?
In essence, an 18th C. petticoat is just two 50-60" (or 127-153 cm) wide rectangles of fabric (you can always use more but that is bare minimum) pleated and sewn together at the side. Easy! Right?
Measure twice, cut once
First, you will need a few measurements, and all of them should be taken with your undergarments on. This means shift, stays and false rump or pocket hoops.
Measurements you will need:
- Waist Circumference
- Waist Center Front to Floor
- Waist Side to Floor
- Waist Center Back to Floor
I will use my measurements as an example. I was wearing my shift, stay, and bumroll.
- Waist: 25"
- CF to Floor: 41"
- Side to Floor: 44"
- Back to Floor: 43"
Now you need to decide how long you want your petticoat to be at the center front. I decided I wanted mine to be 4" from the ground so I could walk and move with ease. If you are going for a walking length gown you may want to make this even shorter. Once you have decided how far off the ground you want your hem to be, subtract that number from all your previous waist to floor measurements.
So for me, subtract 4" from my measurements =
- CF to floor: 37"
- Side to Floor: 40"
- Back to Floor: 39"
These will be the measurements of the final skirt length.
Now we can begin cutting. You will be cutting two rectangles which are 50-60" (127-153 cm) wide and the length of your longest measurement +3", to accommodate the hem and adjustments for length. I used an old bed sheet for my petticoat, and so just used the existing hem. If you are doing something similar only add 1" to your longest measurement.
One piece will be for the front and one for the back. Now at this point, you will want to hem the bottom edge of each piece. We will be adjusting the length at the waist so you can do a straight 1" hem along both pieces, turning them in by 1/2" to cover the raw edge.
One piece will be for the front and one for the back. Now at this point, you will want to hem the bottom edge of each piece. We will be adjusting the length at the waist so you can do a straight 1" hem along both pieces, turning them in by 1/2" to cover the raw edge.
Next, we will mark along the waist - this will be the raw edge - to adjust the length of the skirt. We are adjusting the length of the skirt from the waist, so you are going to make the adjustment at the top of your skirt panel.
Starting at the CF you will measure from the bottom up your CF measurement, in my case 37". Then do the sides with your side measurement, for me 40". To make everything even, I also marked the quarter point. Then draw a line out from the center to edges. Do the same for the back using your back measurements. You should have gentle "v" marked out on your fabric.
Pressing Pressing Pressing...
Next, starting from the center, fold the top of your fabric to the marked line, tuck in the raw edge so that they are encased and work your way to the edge. If you have a large difference between your CF and Side measurement - say for panniers - you may need to make a small slit at the center to ease the fabric. Press to keep the fold in place. You should now have a gentle "v" or scoop shape along the top edge of both pieces of fabric. Leaving the length pressed in the center means you can make adjustments in the future.
 |
| You can see there that the roll get narrower at the end and wider towards the middle. |
Now you can begin pleating. If you like you can measure this out properly, The Mantua Diary has a great formula, but I went by feel rather than hard numbers. In the front, the knife pleat should go out from the waist with a box pleat at the center front, and in the back, the pleats should go in toward the center, with an inverted box pleat at the center. When doing my pleats, I pressed the top 3" or so just to keep them in place.

Once you have finished the pleats, quickly whip or blanket stitch the top edge to keep them secure. I use a blanket stitch and some button thread just to be extra sure. Your stitches do not have to be neat, it will be covered by your waistband.

Once you have finished the pleats, quickly whip or blanket stitch the top edge to keep them secure. I use a blanket stitch and some button thread just to be extra sure. Your stitches do not have to be neat, it will be covered by your waistband.
If you have extra fabric you can make yourself a waistband or use folded ribbon or bias tape, your choice. I made a quick waistband and tacked some twill tape into the center for ties, then attached it to the skirt. Once you have completed both the front and the back pieces go ahead and sew them together at the side, leaving 8-10" at the top open so you can access your pockets if you like.
And you're DONE! Phew.


Now you can twirl around in your living room to your heart's content. You can see here that the petticoat has a nice even hem! Happily, these measurements work over both of my false rumps, but the trick is to make sure you take the measurement OVER your skirt supports so that when you are done that sides and back are not comically short.

Putting on your Petticoat

- With all your appropriate undergarments on, step into your skirt with the back ties in your hand - remember the back side will be marked by the pleats going inward. Tie the ties at your front.
- Give the back a good fluff - most important step tbh - to make sure it is not caught on your bum.
- Take the front ties and tie them behind you. If you like you can tuck in your ties under the waistband of the back section.
- Now that you are all suited up, make sure you can get into your pockets and you are good to go.
Resources
The Mantua Diary - Great Pleating formula
The Fashionable Frolick - Super Detailed Tutorial
Arnold, Janet. Patterns of Fashion: Englishwomen's Dresses & Their Construction. New Ed.] ed. London: New York: Macmillan; Drama Book Publishers, 1977, 6.Tuesday, 14 November 2017
Work Log | 18th C. Shift, Stays and Pocket

You know what they say about historical costuming? "Foundations, Foundations, Foundations!"
er... or something like that.
But in all seriousness, when I began my research into historical dress the piece of advice I found over and over and over again was to have the correct undergarment, no exceptions. In the 18th century, this means: a shift, stays, false rump, pockets, and petticoat(s) - the more the merrier for the later.
Shift
I started with the simplest and most important garment first, the shift. This is later called a chemise and it the closest garment worn to the body under everything else. I learned a whole lot about this garment from Sharon Burnstons incredible website and from the gold standard in historical costuming "Before the Automobile".For my own shift, I decided to go with something very simple, which could be used under multiple gowns. I used the American Dutchess simplicity pattern but omitted the ruffles. I figured I could add flounces and tuckers if needed. I liked the drawstring, square neckline and narrower sleeves in this pattern, and ultimately it was easier than drafting a pattern myself. It is not the most historically accurate, but it does the trick.
I made it from a light cotton voile I had in my stash, with a narrow silk ribbon for the drawstring. Where I could, I finished everything by hand and flat felled every seam. I am very pleased with the finished product and have to resist wearing this as a nightgown.
 |
| My completed shift |
Shift resources:
- Everything you need to know about shifts from Sharon Ann Burton
- Good pattern and how to by the German Marquise
- For a great step by step from Before the Automobile
- A list of extant examples
- American Dutchess Pattern
Stays
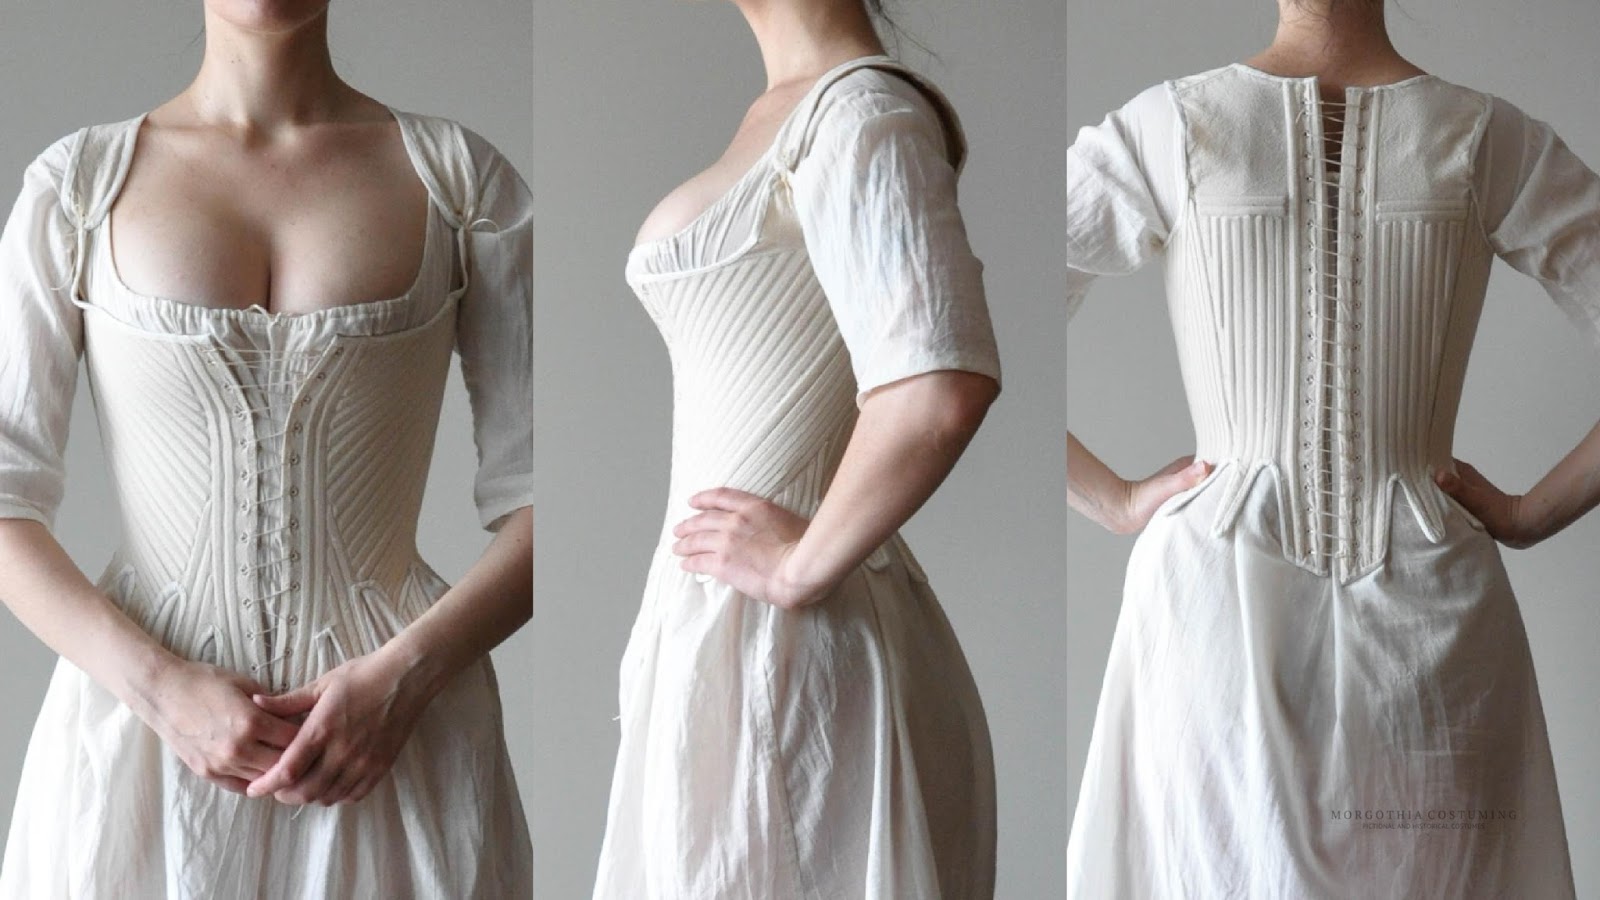
Making the stays was both easier and harder than I expected. Easier insofar as the channels and eyelets went by easily, harder in that getting the fit where I wanted was tricky. Many of the patterns I looked at were very short in the waist and didn't give me enough support or coverage.
I ended up using and modifying Butternick B4254, in part because I had it in my stash, and because it had the option to open at the front and back. Because I knew I would be getting into these myself, I didn't want to have to worry about how I was going to lace them up. Happily, both front and back lacing stays are historically accurate. I did end up lengthening the waist and redrawing the boning channels, but otherwise, the pattern seemed pretty good. In the future, I would move the armhole a bit closer to the front, as you can see there is a bit of gapping near my armpit.
I made my stays out of 2 layers of heavyweight cotton canvas (which I used because it was in my stash) and it is plenty strong. For boning, I used cable ties, a great trick I learned from American Dutchess. It nicely micks the look of reed or whalebone.
I think I will definitely make another pair of stays in the future. As much as I like this first pair, I want ones which are lower in the back and offer a bit more compression in the front to get that nice conical shape. these stays are much better suited to the later decades of the 18th century than I had intended.
Stays Resources
- Informative video from American Dutchess
- Gorgeous example from Before the Automobile
- Extant examples
- The Cut of Women's Clothes by Norah Waugh
- Corsets and Crinolines by Norah Waugh
This was more a small fun project than a necessity. I love embroidering so this was just a chance to do something new. I started off by using the pattern from American Dutchess' Blog, and then just went to town with the floss I had on hand.
I definitely want to make a bigger pocket, and I think I will base it off of this gorgeous example from the V&A

Subscribe to:
Posts (Atom)


