
Monday, 4 December 2017
18th Century Black Gowns | Some research and thoughts
So my story beings with a promise to myself: "Natasha, you will not buy more fabric until you have used what you have in your stash." As it turns out this was a great idea for getting rid of lots of notions, and scraps, as well as basics that I had been lugging with me quite literally across the country. I made my shift, stays, pockets and false rumps all out of fabric I had on hand.
Now when it comes to the dress fabric, well that is a different story. On hand, I have 8 meters of beautiful black brocade and was set on using it to make my first 18th-century gown. However, as it turns out black and brocade together are not particularly fashionable in this period. Anyone who has done even a small amount of research into 18th-century fashions will know that supple silk taffetas and printed cottons in bright colours were all the rage. So, what is one to do when stuck with heavy black brocade?
Well in my case, I researched, and researched and researched. I knew that black brocade would have existed in the 18th c. and there would have been garments made out of it (because if it exists then people do wear it), so I just had to find the right examples. In my research, I found scholars mention black petticoats and occasionally gowns, but never the type of fabric. And when scouring art and museum collections, I would find either a black dress or a brocade dress. Though I could find ample art records of black dresses, they were almost always of satin or taffeta, not brocade. I oscillated between feeling sad I wouldn't look like the gorgeous confections we are accustomed to seeing, and being determined to find an example of black brocade.
So I decided to focus on just black gowns for a while, and ignore the brocade. In the 18th century, it was fashionable to have a portrait in the Vandyke style, this was a black gown with big puffy white sleeve that created a striking look against the alabaster skin of these fair ladies. In many of the portraits, the women appeared to be wearing the exact same outfit right down to the accessories. And while looking at these Vandyke inspired portraits, it occurred to me that what made these firmly 18th-century gowns, rather than the 17th-century gowns they were mimicking, was the millinery and accessories. The hat and feathers, paired with the jewelry as well as the smaller ruffles and trims on the gown sleeve and neckline. It was the extra's that all kept these ladies decidedly contemporary in their fashion, not the colour or fabric of their dress.

In other black gowns too, I found it was the accessories that stood out and made the gowns less somber. Intricate trims, luscious feathers, and colourful ribbon all helped to create a firmly 18th-century look and one which is very bold compared to the usual confections of the day. Gold, pink, red and peach all seem to be popular choices to contrast against darker fabrics.
So for my own gown, I think I will take inspiration from these ladies and start with a simple gown and then go to town on the trimmings and accessories! It might mean making a new shift, and learning how to make a fabulous hat, but that is alright with me, just more skills to hone and learn. Have I mentioned how much better my hand stitching has gotten since starting historical costuming?
So the lesson is: there are many routes to an authentic look. Though perfectly accurate fabric is a bonus, less fashionable fabrics can be decked out to create an equally fashionable look. And you can bet your bottom that beautiful black brocade would not have been wasted in the 18th century, so I sure as heck am not going to either.

Resources
- My Pinterest Board full of 18th C. Images
- Berg, Maxine. "Women's Consumption and the Industrial Classes of Eighteenth-Century England." Journal of Social History 30, no. 2 (1996): 415-34.
- Ribeiro, Aileen. "Some Evidence of the Influence of the Dress of the Seventeenth Century on Costume in Eighteenth-Century Female Portraiture." The Burlington Magazine 119, no. 897 (1977): 834-32.
Monday, 27 November 2017
Tutorial | 18th Century Petticoat

Making this darn thing was a serious act of hubris. I figured since I had made the stays with no problem and had sewed more complicated garments in the past, how hard could it be to make a pleated tube skirt? So with all the confidence in the world, I took a look at some extant pieces and just started hacking and smashing my way through only to redo this petticoat 3-4 times depending on how you count. Even after looking at some great resources such as American Duchess's Tutorial and the excellent how-to from Koshka the Cat, I still managed to muck it up.
So I thought I would write a blog post, in the hopes you can learn from my mistakes, even though such blog posts did not stop my brazen ego.
In essence, an 18th C. petticoat is just two 50-60" (or 127-153 cm) wide rectangles of fabric (you can always use more but that is bare minimum) pleated and sewn together at the side. Easy! Right?
In essence, an 18th C. petticoat is just two 50-60" (or 127-153 cm) wide rectangles of fabric (you can always use more but that is bare minimum) pleated and sewn together at the side. Easy! Right?
Measure twice, cut once
First, you will need a few measurements, and all of them should be taken with your undergarments on. This means shift, stays and false rump or pocket hoops.
Measurements you will need:
- Waist Circumference
- Waist Center Front to Floor
- Waist Side to Floor
- Waist Center Back to Floor
I will use my measurements as an example. I was wearing my shift, stay, and bumroll.
- Waist: 25"
- CF to Floor: 41"
- Side to Floor: 44"
- Back to Floor: 43"
Now you need to decide how long you want your petticoat to be at the center front. I decided I wanted mine to be 4" from the ground so I could walk and move with ease. If you are going for a walking length gown you may want to make this even shorter. Once you have decided how far off the ground you want your hem to be, subtract that number from all your previous waist to floor measurements.
So for me, subtract 4" from my measurements =
- CF to floor: 37"
- Side to Floor: 40"
- Back to Floor: 39"
These will be the measurements of the final skirt length.
Now we can begin cutting. You will be cutting two rectangles which are 50-60" (127-153 cm) wide and the length of your longest measurement +3", to accommodate the hem and adjustments for length. I used an old bed sheet for my petticoat, and so just used the existing hem. If you are doing something similar only add 1" to your longest measurement.
One piece will be for the front and one for the back. Now at this point, you will want to hem the bottom edge of each piece. We will be adjusting the length at the waist so you can do a straight 1" hem along both pieces, turning them in by 1/2" to cover the raw edge.
One piece will be for the front and one for the back. Now at this point, you will want to hem the bottom edge of each piece. We will be adjusting the length at the waist so you can do a straight 1" hem along both pieces, turning them in by 1/2" to cover the raw edge.
Next, we will mark along the waist - this will be the raw edge - to adjust the length of the skirt. We are adjusting the length of the skirt from the waist, so you are going to make the adjustment at the top of your skirt panel.
Starting at the CF you will measure from the bottom up your CF measurement, in my case 37". Then do the sides with your side measurement, for me 40". To make everything even, I also marked the quarter point. Then draw a line out from the center to edges. Do the same for the back using your back measurements. You should have gentle "v" marked out on your fabric.
Pressing Pressing Pressing...
Next, starting from the center, fold the top of your fabric to the marked line, tuck in the raw edge so that they are encased and work your way to the edge. If you have a large difference between your CF and Side measurement - say for panniers - you may need to make a small slit at the center to ease the fabric. Press to keep the fold in place. You should now have a gentle "v" or scoop shape along the top edge of both pieces of fabric. Leaving the length pressed in the center means you can make adjustments in the future.
 |
| You can see there that the roll get narrower at the end and wider towards the middle. |
Now you can begin pleating. If you like you can measure this out properly, The Mantua Diary has a great formula, but I went by feel rather than hard numbers. In the front, the knife pleat should go out from the waist with a box pleat at the center front, and in the back, the pleats should go in toward the center, with an inverted box pleat at the center. When doing my pleats, I pressed the top 3" or so just to keep them in place.

Once you have finished the pleats, quickly whip or blanket stitch the top edge to keep them secure. I use a blanket stitch and some button thread just to be extra sure. Your stitches do not have to be neat, it will be covered by your waistband.

Once you have finished the pleats, quickly whip or blanket stitch the top edge to keep them secure. I use a blanket stitch and some button thread just to be extra sure. Your stitches do not have to be neat, it will be covered by your waistband.
If you have extra fabric you can make yourself a waistband or use folded ribbon or bias tape, your choice. I made a quick waistband and tacked some twill tape into the center for ties, then attached it to the skirt. Once you have completed both the front and the back pieces go ahead and sew them together at the side, leaving 8-10" at the top open so you can access your pockets if you like.
And you're DONE! Phew.


Now you can twirl around in your living room to your heart's content. You can see here that the petticoat has a nice even hem! Happily, these measurements work over both of my false rumps, but the trick is to make sure you take the measurement OVER your skirt supports so that when you are done that sides and back are not comically short.

Putting on your Petticoat

- With all your appropriate undergarments on, step into your skirt with the back ties in your hand - remember the back side will be marked by the pleats going inward. Tie the ties at your front.
- Give the back a good fluff - most important step tbh - to make sure it is not caught on your bum.
- Take the front ties and tie them behind you. If you like you can tuck in your ties under the waistband of the back section.
- Now that you are all suited up, make sure you can get into your pockets and you are good to go.
Resources
The Mantua Diary - Great Pleating formula
The Fashionable Frolick - Super Detailed Tutorial
Arnold, Janet. Patterns of Fashion: Englishwomen's Dresses & Their Construction. New Ed.] ed. London: New York: Macmillan; Drama Book Publishers, 1977, 6.Sunday, 19 November 2017
Work Log | 18th C. False Rumps

I like big voluminous skirts (and I cannot lie). *cough*
Sorry...
To be quite sincere, however, one of the things I love most about historical fashion is the variety of silhouettes and shapes which came in and out of style. Skirts, sleeves, bodices, and especially bums were are all molded, shaped and padded to achieve the day's most fashionable look. But in the 18th century when it came to butts and hips, the general rule was bigger is always better.
 |
| A selection of great contemporary cartoons. |
Ladies layered up pocket hoops, false rumps, and petticoats in different combinations to create the desired shapes, which, lucky for us, created excellent material for contemporary satirical artists, and provides us with great information. The ladies over at Demode Couture tried out many of the shapes you can see in these sources and shared the results! Such a wonderful piece of work by these ladies, so I followed their lead when choosing the 2 shapes I ultimately went for.
I wanted false rumps which would be able to be worn with several different gowns, over a large amount of time. Rump shapes changed quite a lot over the century, but I thought the two I chose gave me quite a lot of options.
The Continental Shelf

I affectionately call this rump "the continental shelf," because it really emphasizes the hips (especially on my body), with quite a sharp drop off. It is more properly called a bum roll, or sometimes and Elizabethan bum roll. I really like the shapes this gives. It is almost like mini-panniers, and I could see amping up the shapes to emphasizes this even more, which you can see in some of the sources above. This silhouette works well for middle-ish decades (1730-1770) and for middling and working classes - a la Outlander. It is not a luxurious shape, or too extreme (comparative to some of the fashionable door busting shapes of time).
To make this false rump, I used some scrap linen I had in my stash and stuffed it with fabric scraps (a good cheap and historically accurate solution). I like that the weight of the fabric scraps helped the roll to sink into my natural shape - you can see it dip down at my center back. I think this gives it a much more natural look and maintains a bit of my bodies proportions. You can see in the bottom left photo how well this roll emphasizes my hips and gives the illusion of a much narrower waist.
 |
| The "Continental Shelf" in action |
The Big Booty Bump

This false rump simultaneously gives a bigger and softer silhouette, that is all about the booty. I thought the hip parts would be too extreme but they really help with the proportions and softness of the silhouette. I was really worried when I made this that is was just going to be comically large, but it turns out that size is perfect! This shape is softer, and better suited to the later decades (maybe 1770-1790ish). Again it is not so extreme that it cannot be worn by middling classes, but there is something a bit more sumptuous and provocative about this silhouette.
I made this rump out of scrap cotton I had in my stash, and used some pillow batting to stuff it (not HA but it did the trick), and used the American Duchess Simplicity Pattern. I didn't use scrap fabric to stuff this one because the amount needed would have made it very heavy. Large rumps like this could have been stuffed with cork shavings, sawdust, wool, or possibly a combination.
 |
| The Booty Bumper in action |
Resources
Demode Couture - These ladies tried so many shapes!
The Importance of Skirt Supports with American Duchess
Tutorial on "Continental Shelf" Style Bumroll - Elizabethan Costumes
Tuesday, 14 November 2017
Work Log | 18th C. Shift, Stays and Pocket

You know what they say about historical costuming? "Foundations, Foundations, Foundations!"
er... or something like that.
But in all seriousness, when I began my research into historical dress the piece of advice I found over and over and over again was to have the correct undergarment, no exceptions. In the 18th century, this means: a shift, stays, false rump, pockets, and petticoat(s) - the more the merrier for the later.
Shift
I started with the simplest and most important garment first, the shift. This is later called a chemise and it the closest garment worn to the body under everything else. I learned a whole lot about this garment from Sharon Burnstons incredible website and from the gold standard in historical costuming "Before the Automobile".For my own shift, I decided to go with something very simple, which could be used under multiple gowns. I used the American Dutchess simplicity pattern but omitted the ruffles. I figured I could add flounces and tuckers if needed. I liked the drawstring, square neckline and narrower sleeves in this pattern, and ultimately it was easier than drafting a pattern myself. It is not the most historically accurate, but it does the trick.
I made it from a light cotton voile I had in my stash, with a narrow silk ribbon for the drawstring. Where I could, I finished everything by hand and flat felled every seam. I am very pleased with the finished product and have to resist wearing this as a nightgown.
 |
| My completed shift |
Shift resources:
- Everything you need to know about shifts from Sharon Ann Burton
- Good pattern and how to by the German Marquise
- For a great step by step from Before the Automobile
- A list of extant examples
- American Dutchess Pattern
Stays
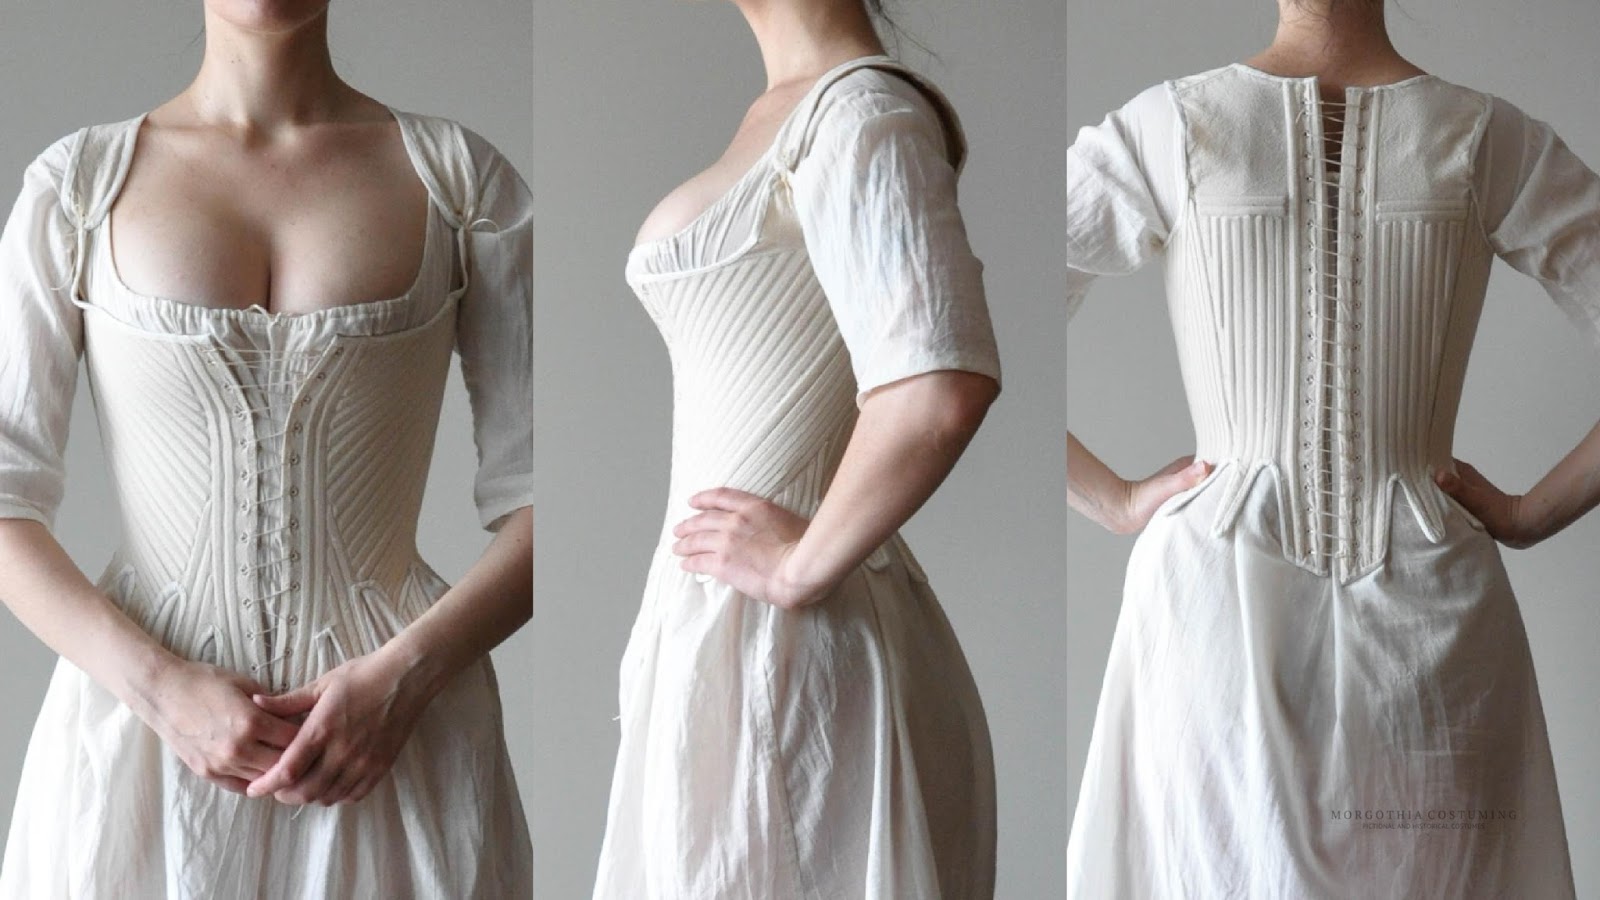
Making the stays was both easier and harder than I expected. Easier insofar as the channels and eyelets went by easily, harder in that getting the fit where I wanted was tricky. Many of the patterns I looked at were very short in the waist and didn't give me enough support or coverage.
I ended up using and modifying Butternick B4254, in part because I had it in my stash, and because it had the option to open at the front and back. Because I knew I would be getting into these myself, I didn't want to have to worry about how I was going to lace them up. Happily, both front and back lacing stays are historically accurate. I did end up lengthening the waist and redrawing the boning channels, but otherwise, the pattern seemed pretty good. In the future, I would move the armhole a bit closer to the front, as you can see there is a bit of gapping near my armpit.
I made my stays out of 2 layers of heavyweight cotton canvas (which I used because it was in my stash) and it is plenty strong. For boning, I used cable ties, a great trick I learned from American Dutchess. It nicely micks the look of reed or whalebone.
I think I will definitely make another pair of stays in the future. As much as I like this first pair, I want ones which are lower in the back and offer a bit more compression in the front to get that nice conical shape. these stays are much better suited to the later decades of the 18th century than I had intended.
Stays Resources
- Informative video from American Dutchess
- Gorgeous example from Before the Automobile
- Extant examples
- The Cut of Women's Clothes by Norah Waugh
- Corsets and Crinolines by Norah Waugh
This was more a small fun project than a necessity. I love embroidering so this was just a chance to do something new. I started off by using the pattern from American Dutchess' Blog, and then just went to town with the floss I had on hand.
I definitely want to make a bigger pocket, and I think I will base it off of this gorgeous example from the V&A

Thursday, 17 November 2016
Back to Basics: Planning Your Next Costume


This article was first published in November 2016. It has been edited and republished here on my new blog.
It can be so easy to get swept up in the frenzy of convention season and Internet hype that you end up with more costume plans than any one person can manage. Though I am guilty of this myself, here is my costume planning process which is designed to keep my delusions of grandeur in check.
The Cosplay Wishlist
This is a folder in my Dropbox where I put images of costumes that I would like to tackle. Anytime I see something that grabs my attention, or when I just cannot get an idea out of my head, I go ahead and add a picture. Sometimes a character gets a folder and loads of images and research, sometimes they only get a single image. It just depends on the level of mania that inspires me on a given day.
Once my midnight frenzy has completed I let the character sit there for awhile as I finish other projects. I let them sit so that I can be sure the costume or character or world is something that really inspires me and will bring me joy to create. So many times I have jumped on projects only to abandon them halfway through because "it was just a phase." When I am ready to start a new project I revisit this folder, delete the costumes that no longer inspire me and select one which I want to build. Done. Right? Well not quite.
Skill Test
Every costume project comes with new challenges, and for most people that challenge is half the fun, but it is always good to take a step back and evaluate your skills, and the skills required to make your chosen costume.
What parts are going to give me trouble? Do I have a basic plan for each element of the costume? Is that plan do-able within my skill level? Am I willing to take the time (and often money) to learn a new skill or improve my own knowledge? If I answer "no" to any of these questions, I take a step back and evaluate if I am capable of creating a costume. I really struggle with prop construction, and so I often have to choose characters without elaborate props, or I make a secondary plan for commissioning someone.
This does not mean you should not challenge yourself - I built my entire demon hunter without knowing the first thing about worbla - but having an honest conversation with yourself can save you some heartache. If you decide the costume is worth the effort and frustration then I encourage you to push your fabrication to the next level, but it is also okay to stay within your comfort level and kill it! Taking this extra time to reflect means less failed costumes down the road, which means less wasted materials.
Budgeting
This is a HUGE part of my planning process. Though I would love to create whatever I want without having to worry about how much it will cost, that is not smart financial planning and not sustainable. I want to continue cosplay, and that means I have to cosplay within my means. Now, this doesn't mean I don't drop scary amounts of money into cosplay but I always do it intentionally. I don't let the cost sneak up on me.
 |
| Here is my budget for Claire, try to be as detailed as possible! |
So once I have a character in mind I start to break down the costume into parts and pricing out in as much detail as I can, this means materials, tools, safety equipment, shipping, patterns and anything else that might be required (in my case 5-10 cans of NOS and a few runs to Five Guys and Fries). Tools and especially safety equipment need to be factored in as costs, though they might be seen as investments and used for several projects. I also add a buffer of $50-$100 depending on the costume and tack that on for unforeseen expenses. Things like sharpies, glue and sewing notions often get forgotten in my break down but this way everything is accounted for.
It is at this point I am confronted with the horrible truth: the cost of cosplay. Sometimes I will do an expensive version and a cheap version of the budget depending on the costume, and often times you can get creative about ways to cut costs. I started foam smithing as a way to cut costs over worbla, but in the process, I learned a whole new technique which I actually prefer. But had I not done a budget break down I might never have learned the fabulous technique. In some cases however the cost of a costume halts any further plans, like Lara Croft's new kit (so much leather) or Claire from Outlander (so much fabric). If I decide that the cost is worth the experience, I begin to accumulate materials and the fun can commence. Woohoo!
Next time on Back to Basics, shopping for cosplay materials!
Monday, 14 November 2016
Back to Basics | Conscious and Careful Costuming


This article was first published in Oct 2016, I have edited it and republished here on my new blog.
I am starting a blog series called "Back to Basics." In this series, I am going to break costuming down and strip it of all the fancy tools and workshops. I am going to explore the fundamentals of the costuming experience and revisit some long lost crafting techniques, before the days of thermoplastics and LEDs.
This idea came to me as a sat in my new workshopless apartment. I moved 3500km away from my crafting cave and left all my tools and costumes behind. So alone in my kitchen, unnervingly free of EVA dust, I reflected on how far I have come from when I started cosplay, and how much my costuming experience has changed over the years. It was just me and my limited knowledge, even fewer skills, and zero tools. Alea was mashed together with tinfoil, hangers, a thrifted leather jacket, scary amounts of duct tape and sheer force of will. My Death Knight, in contrast, has 2 kinds of EVA foam, expanding foam, 2 types of worbla, 3 types of clay, resin, stones, wood, real deer antlers, leather,2 primers, 15 colors of paint, acrylic ink, acrylic varnish, etc, etc.
 |
| Cost and time change |
I loved my workshop. I loved my hoard of tools and collection of materials, but I now find myself in a place without them, so I want to challenge myself to get back to those fundamental skills and basic tools. To return to the time when it was just me and my crazy plans because I don't need a fancy workshop, and I think sometimes we all need to remind ourselves of that. I hope that experienced costumers will enjoy the series and see it as a way to simplify their crazy costuming life and reconnect with some the long-lost crafting techniques. I hope the new costumers will see this as a demonstration of crafting done on a budget, under constraints, and see that if they have the passion and creativity they can create their own costumes in whatever circumstance they find themselves in.
At the root of it, costuming has made me happiest when I was creating something I loved, and I want to share that very basic idea with you.
If you have any ideas or topics you want to be discussed let me know in the comments!
Next time on Back to Basics, Planning a Costume.
Subscribe to:
Posts (Atom)


